Pull Toy Project
As you can tell, our next project is to sketch, design, and build a pull toy using one of the gear systems from the Mechanical Gears Project. Today was the first day of the project, so we did a little bit of individual sketching for some ideas on what and how to build a pull toy. This is what a pull toy is: We have to build a mechanism with wheels that will trigger some kind of motion. The wheels will be the ones generating the motion because we will have one person build a car to pull the other cars. In other words, the gear system has to be connected with the wheel shafts so it's able to work. The wheel gear would move, therefore moving the shaft, which would move your gear system, creating some kind of motion. For instance, I can put a system of spur and bevel gears to connect the shaft to a fan on top of the car. Every time the car moves forward or backward, it would make the gears move the shaft, who will, in turn, move the fan. It's kind of like a toy helicopter.
The picture on the bottom is my sketch ideas before I met my partners, Jacklyn and Daniel.

Recently, after I met with my 3 member group, my teacher announced that I would be working on a different assignment, which was to build a car that would pull a train of pull toys. The second sketch below is the complex gear system I'm building to generate more torque to pull all the other pull toys. I just drew a quick little doodle of all the materials I need for the exterior of the car and how it might look like. The circles that have numbers in them represent what size gear I'm using and where they're connecting. The fractions represent how I calculated speed. The numbers come from the number of teeth each gear has, and I multiply the ratio of each gear with each other to calculate which has more torque.
The picture of the tissue box served as a model for my complex gear system build, so I could plan out where and how to build the exterior of the car. Mr. Reyes helped me by teaching me how to calculate the speed of complex gear system by multiplying the ratio of the teeth in the gear. By finding and rounding the answers, I could compare and contrast which gear systems would work best to generate torque. This time, my assignment isn't to create the fastest car, but to create a car strong enough to pull other cars. In order to build a strong car, I need a gear system with more torque, meaning less speed but more spinning force.


Recently, Mr. Reyes had an idea about making another car with the exact same gear system, so we could have 2 cars pulling the pull toys at the same time. We predicted that it would help with torque. Of course, after many days of building the prototype of what the car was supposed to look like, we encountered the exact same problem: torque. At first, we thought that wouldn't be that bad of a problem because our gear system was designed to focus more on torque than speed. Little did we know how slow our cars were moving before we tested them out. It was super slow just by themselves at max speed, but by pulling just 2 or 3 cars, our car just stopped, unable to support the weight of the other cars. It really threw the whole class off that our two main cars that play the main role in this project were not functioning correctly. We were really thrown off guard at the sudden news and were just confused about what to do next. That was when Mr.Reyes told us that we just need to change the gear system a little bit, so we took out the big gear, changing the complex gear system to a simple one. It wasn't necessarily the best system we would come up with, but it was better than the old system we tested out. If worst came to worst, we could just build a fast gear system.
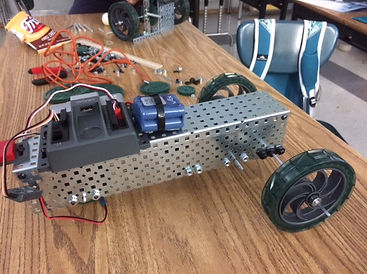
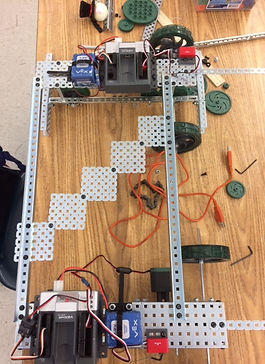
These two pictures on the bottom are just my car. The other car that I mentioned earlier will be in another location since I didn't have any pictures of the other car by itself.

Therefore, we changed the complex gear system, programmed it to max speed, and added a limit switch to our car. Once again, we brought the two cars out for testing, and we encountered several problems. First, the cars kept turning due to the weight of the cars behind them. Second, the cars were going at different speeds, even though the programming was exactly the same. The speed was probably different because of how heavy each car was independently. In any case, things weren't working out well. That was also when Mr. Reyes came up with a brilliant idea; to attach the 2 cars together, so they would stay together and support each other. Without those 2 cars attached, the cars would keep going off on their own, breaking the formation of the pull toy train. We decided to attach these 2 cars together by using long frames to attach them across from each other and 4 thin frames in the back to equally share the weight of pulling the pull toys. The result was a success! The speed is even now, and the only problem is how the car keeps turning to the right. Anyways, the major problem is solved, so we're finally set for the finale of the pull toy project; the pull toy parade.
The pictures on the bottom are our 2 cars look like after they are connected to each other. The picture below that is a snip of the programming used to program the cars.

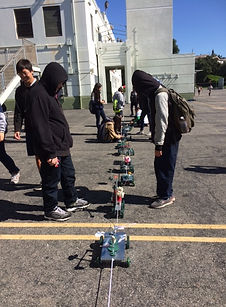
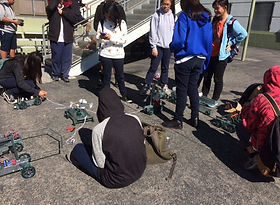
Here are several other pictures of all of the pull toys lined up and ready for the pull toy train. Below that is a Vimeo video on the race. It turns out, our 2 cars weren't able to support all of the pull toys, so Erika had to manually pull them by hand. The video slowly goes oveer all of the pull toy's function. Check it out!